general wellbeing

Detoxification Kit
USD $91.95
free shipping over $100 (USA & Canada)
1-877-937-4372 the pet expert hotline

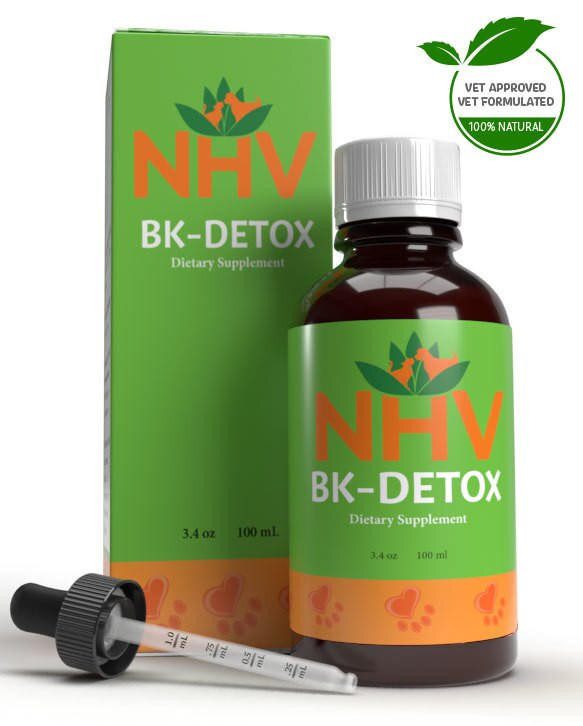
Detoxifies the Blood and Organs, Boosts (support) the Immune System

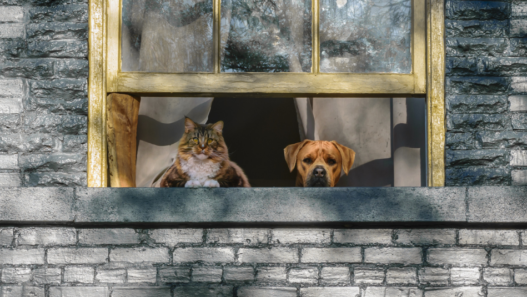
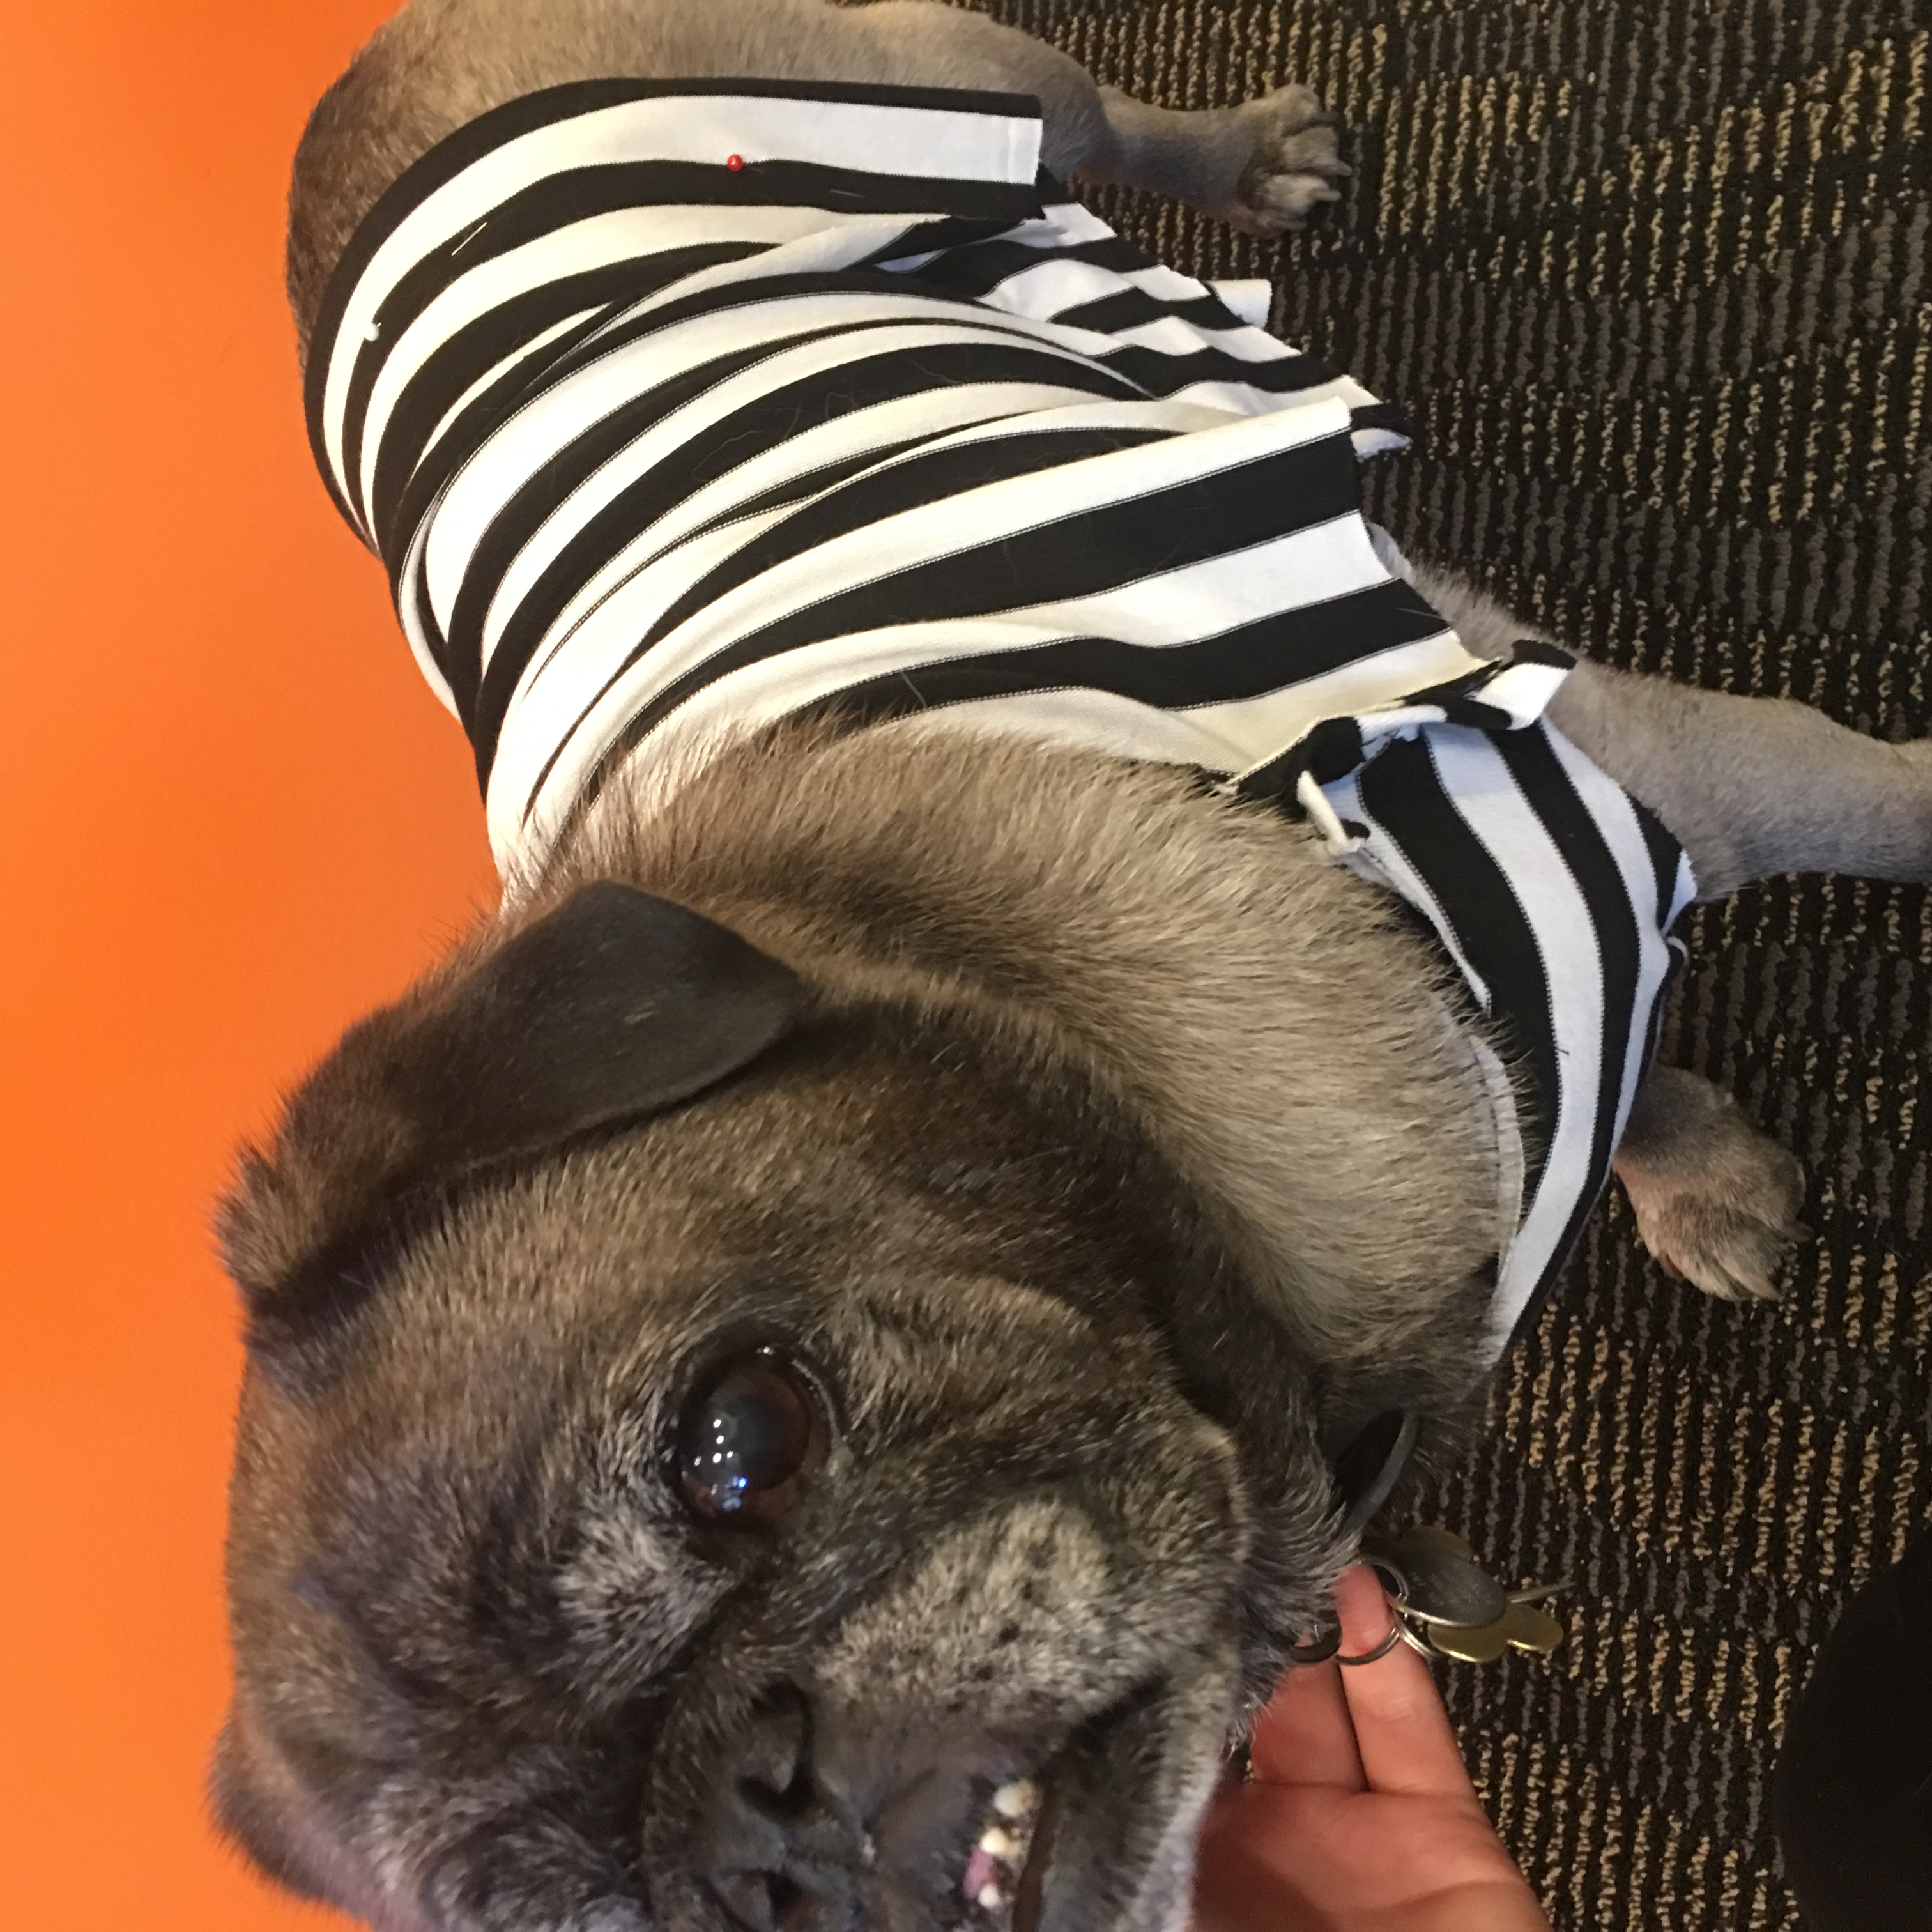
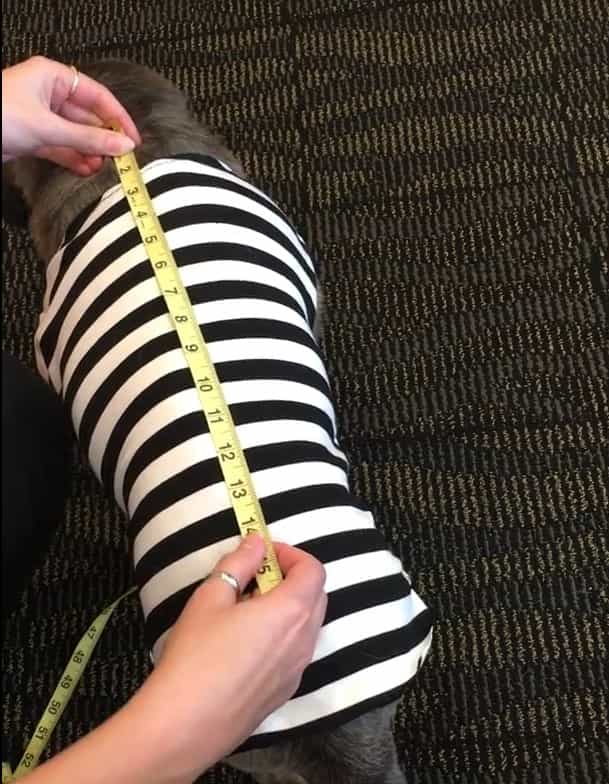
Not sure what to dress your furkiddo up as for Halloween? NHV is here to help! We have created an easy DIY Pet Costume so you can arrive at the #NHVhalloweendancepawty in style! Your beloved little food thief can dress up as the Hamburglar by following these simple steps.

This costume can be made from scratch or easily assembled if you already have similar pieces. The costume consists of a shirt, a cape, a hat, and a tie.
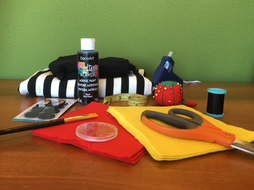
• Black and white striped stretchy fabric (like a jersey knit or rayon)
• Black or white thread
• Sewing needle
• Scissors
• Sewing pins
1. Find a shirt sewing pattern that will work for your dog. These can be found online or in a fabric store. We used one from mimiandtara.com which are great for small to medium size dogs.
2. Measure your dog based on the pattern to figure out which pattern size will fit them and how much fabric you need.
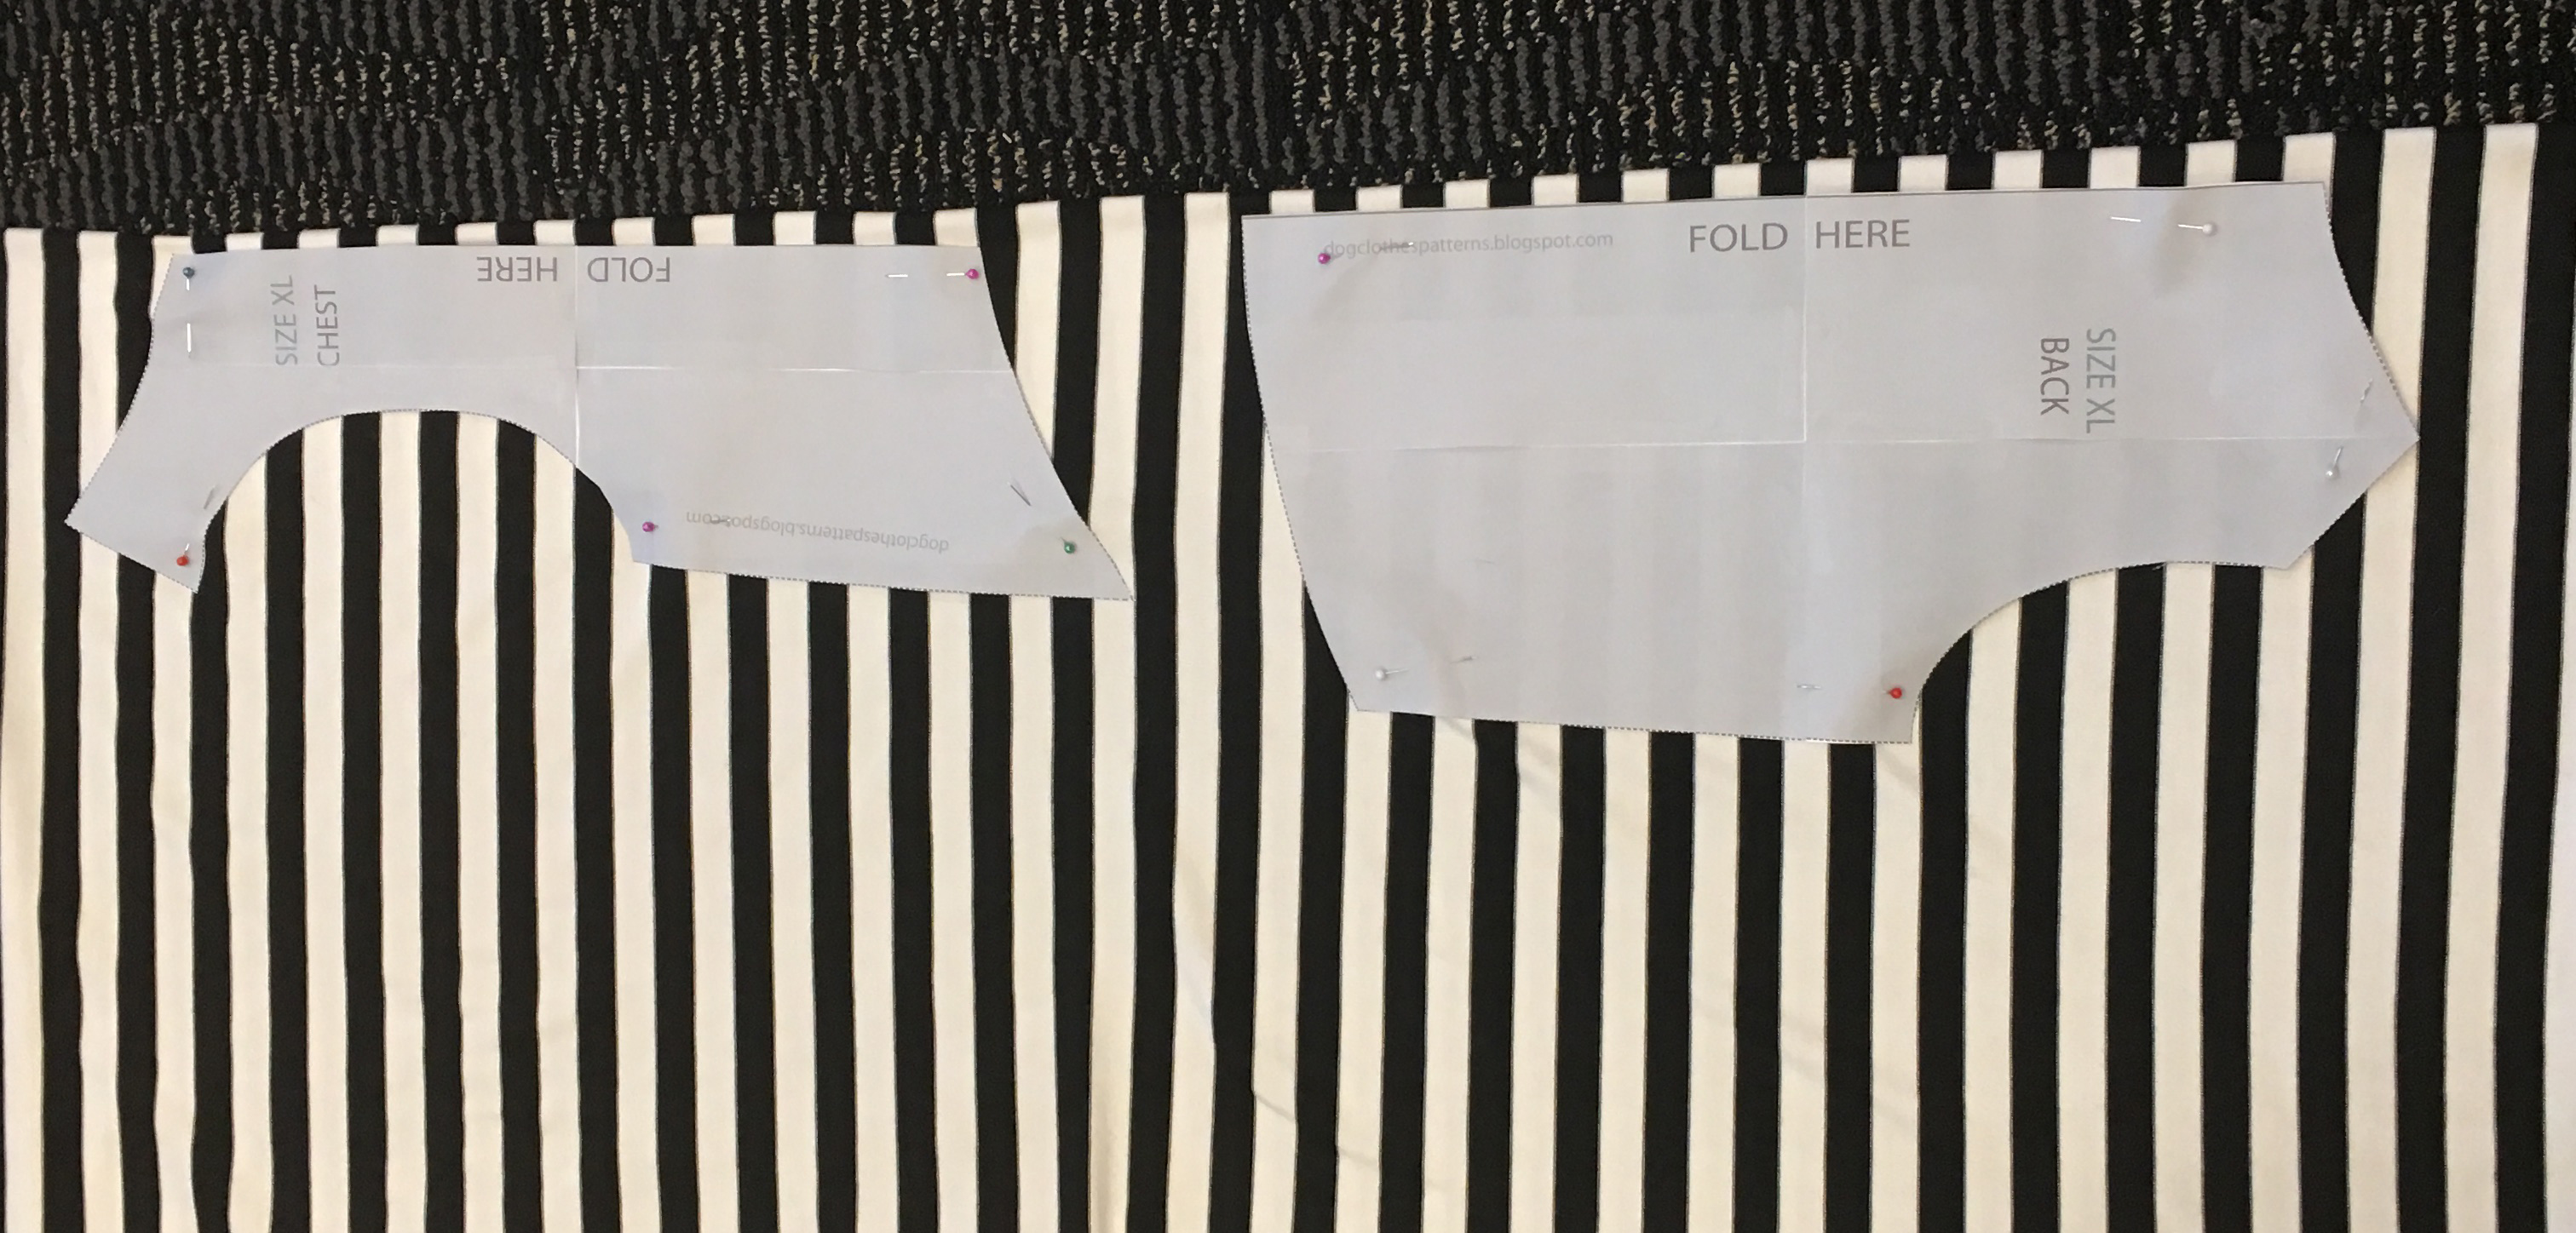
3. Fold the fabric in half (backside facing out) and lay the pattern down along the folded edge. Pin to hold pattern in place.
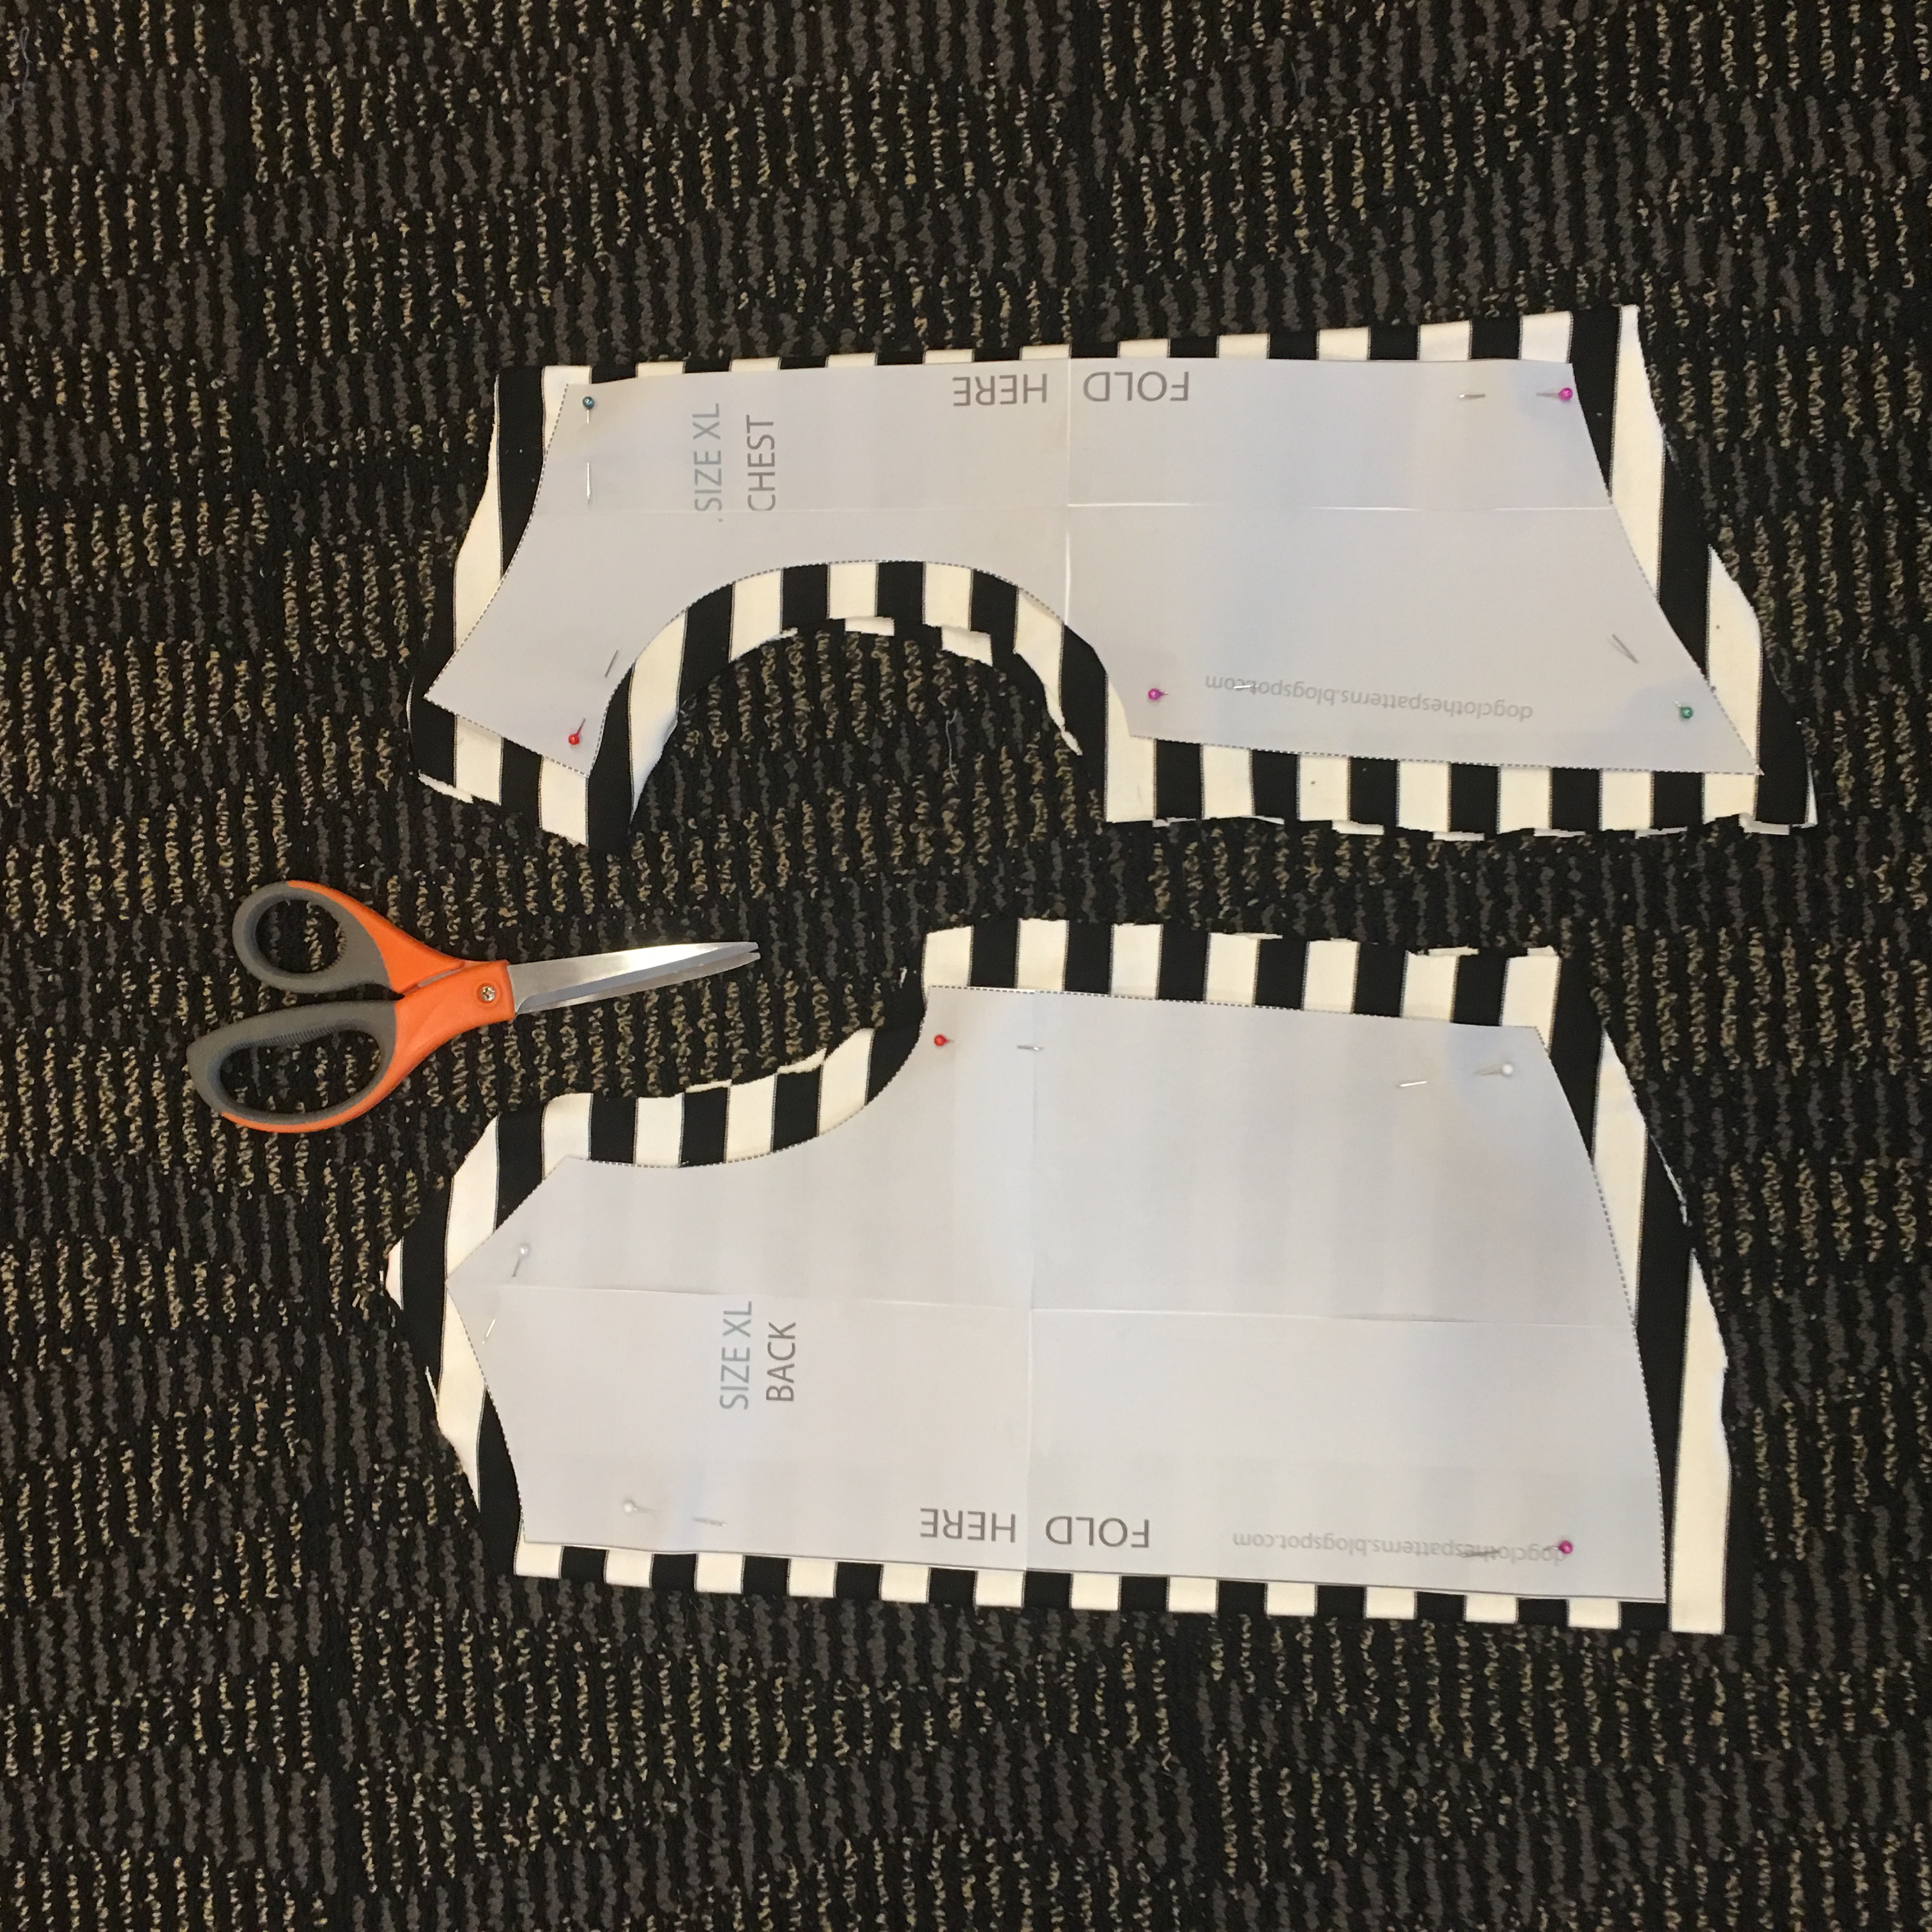
4. Cut fabric around the edge of the pattern
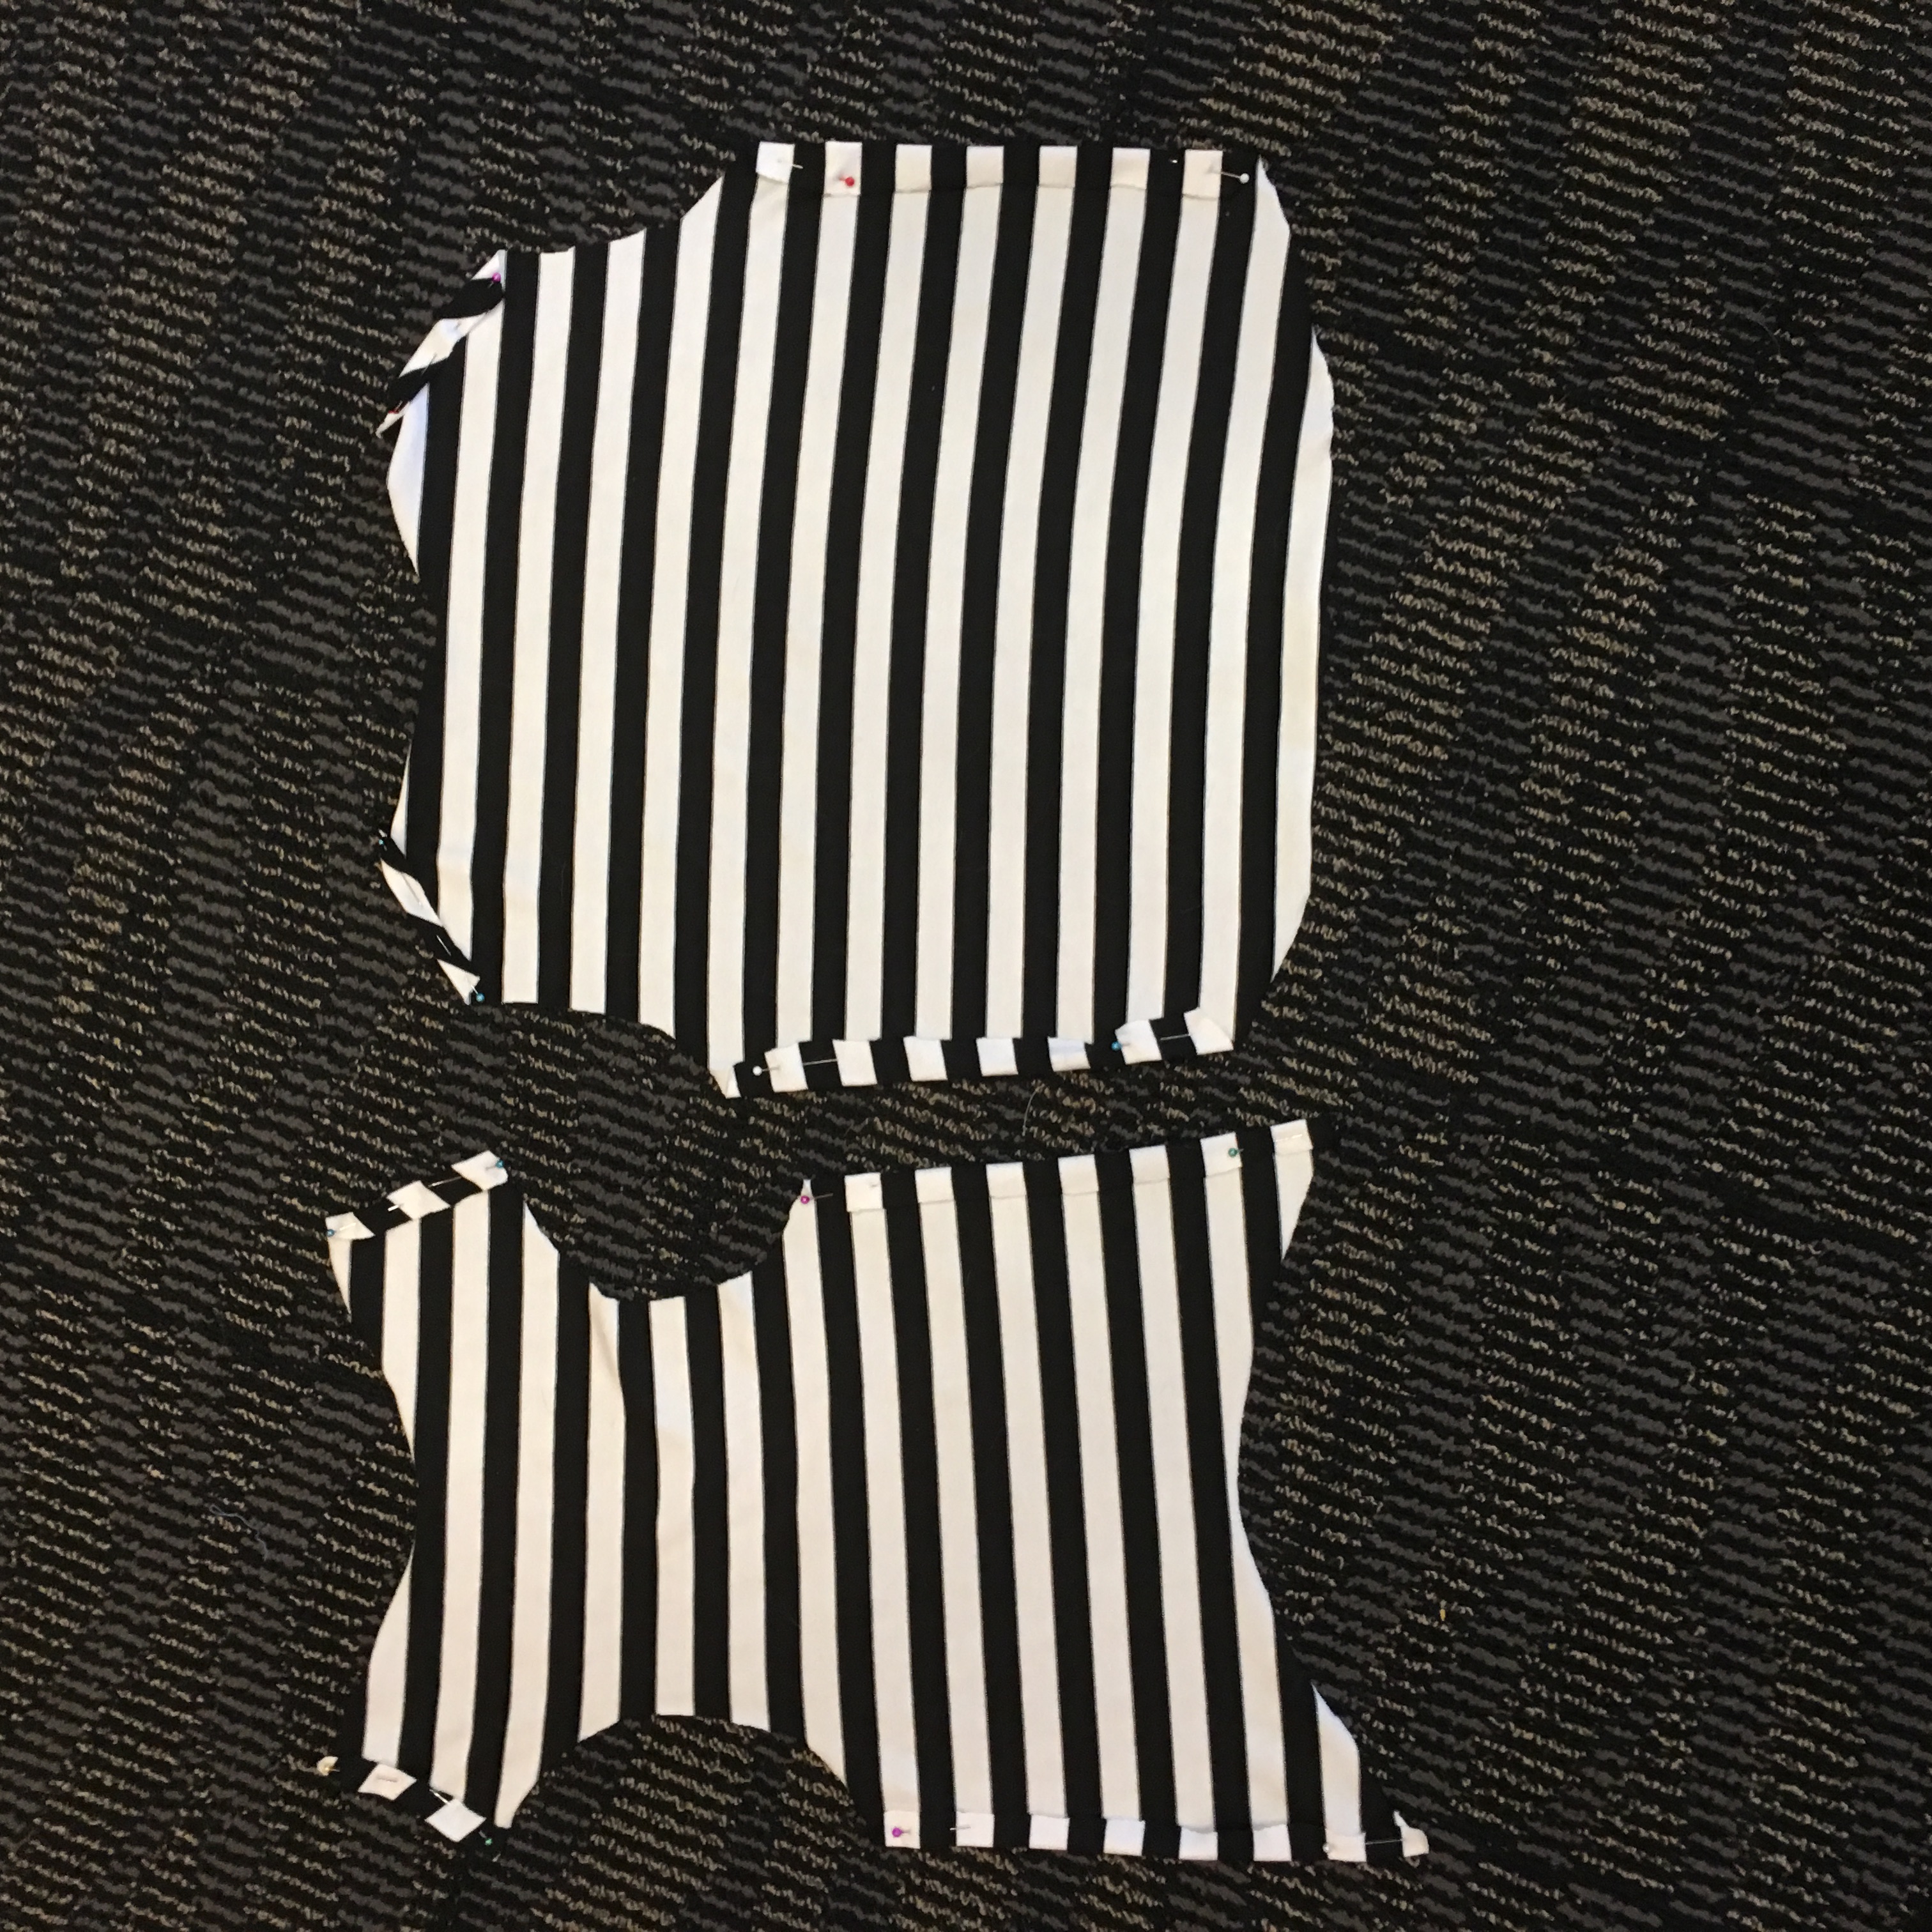
5. Remove pattern from the fabric and unfold. Lie fabric face-down and fold edges in 1-2 cm, pin down.
6. Sew along cut edge to create finished hems and prevent the fabric from fraying.
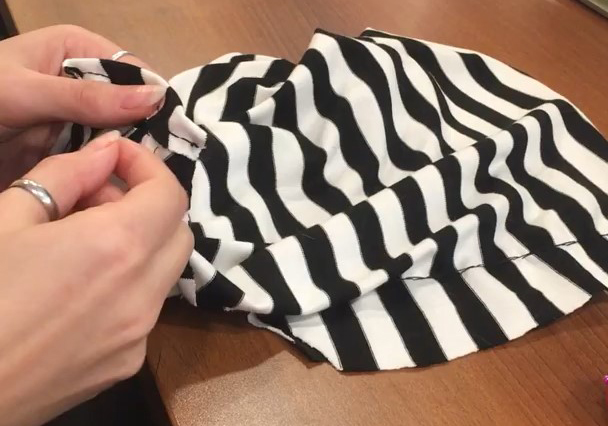
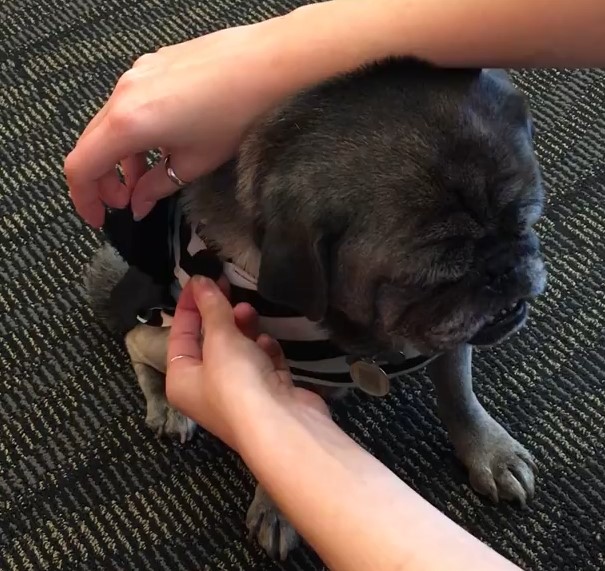
7. Once all the edges have been hemmed, lay both pieces down with the front side facing in towards each other. Pin the sides and shoulders of the shirt together.
8. Try it on your pet to make sure it fits your pet. Be careful to make sure that the pins do not poke your pet.

9. Once the shirt has been pinned to fit your pet, take the shirt off and sew the sides and shoulders closed along the pins.

10. Once finished sewing, remove all pins and flip them inside out so that the front side of the fabric is out.
• Black non-stretchy fabric (like cotton broadcloth)
• Scissors
• Black velcro adhesive dots
1. Measure from your pet’s collar to their waist.
2. Cut a square of the black fabric that is the width and length as measured.
Tip: Check to make sure that the cape is not going to hang too far down on the sides. It should fall to the bottom of their torso and not be so long that they could trip or get caught.
3. Place a velcro dot on the top two corners of the square.
4. Lay fabric square on the pet with top corners on each side of the neck. Place matching velcro dots on the shirt to line up with the velcro dots on the cape.
• Red felt
• Hot glue
• Black permanent marker
• Scissors
• Black velcro adhesive dots
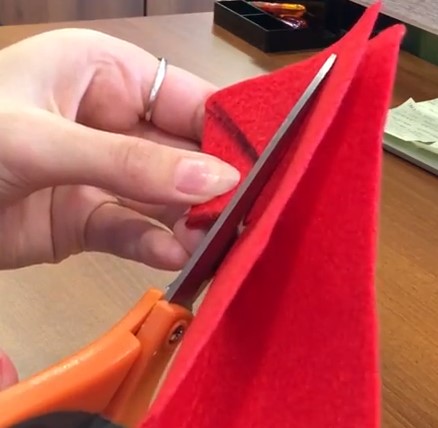
1. Fold red felt in half draw a half diamond shape approximately 1-2 inches out from the fold. Cut the shape out while still folded. This will make the knot of the tie.

2. On another piece of red felt, fold in half and place unfolded diamond at the top. Draw tie shape along the fold with permanent marker. Cut out along line while still folded in half. This will make the tail of the tie.
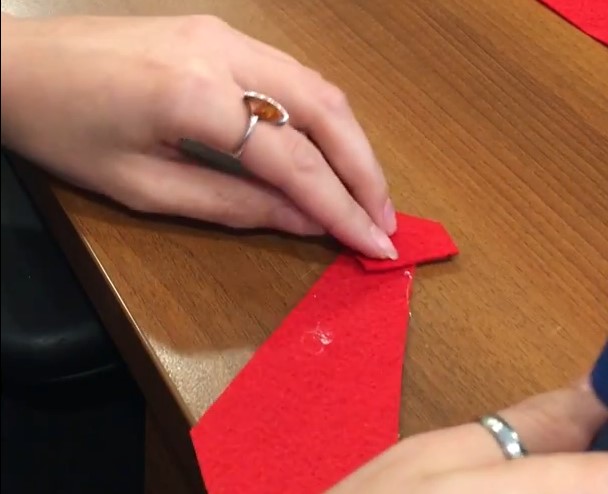
3. Unfold second felt piece. Glue diamond shape at the top of the second piece with hot glue.
4. Stick velcro dot at the top of the tie on the backside.
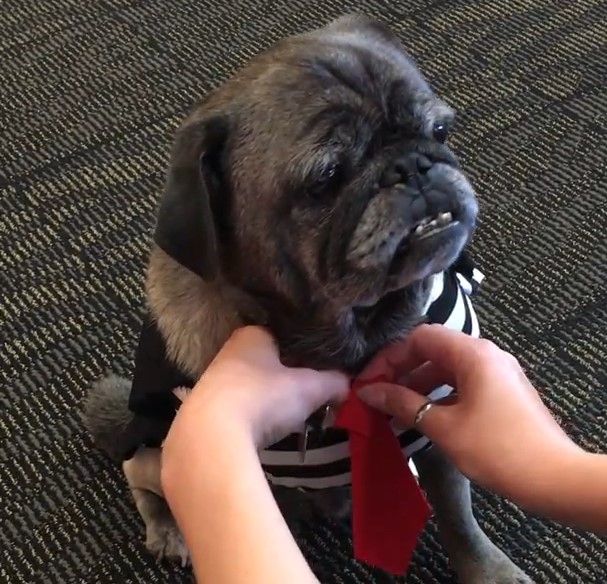
5. Place the matching velcro dot in the shirt at the center of the chest along the collar.
• Cardboard
• Yellow felt
• Black felt
• Hot glue
• Black permanent marker
• Scissors
• Box cutter or x-acto knife
• Black paint
• Paintbrush

1. Measure the width of your pet’s head from ear to ear.
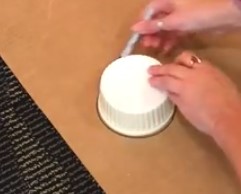
2. Draw a circle on the cardboard that is approximately one inch smaller in diameter than the width of your pet’s head. Cut the circle out as closely to the line as possible. This will be the top of the hat.
Tip: If your pet has pointed ears, measure between the ears and make this circle only half the diameter of this space.
Tip: You can use a bowl or cup that has a similar diameter to trace a circle.

3. Draw another circle on the cardboard that is approximately double the diameter. Cut the circle out as closely to the line as possible. This will be the brim of the hat.
4. Measure the circumference of the smaller circle. Cut a 2-inch wide strip of cardboard that is 2 inches longer than the circumference measured. This will be the crown of the hat.

5. Use the hot glue to attach the top edge of the cardboard strip along the edge of the small cardboard circle. Tuck the extra 2 inches of the strip inside and glue to keep secure.
Tip: Use your hands to curl the cardboard strip before trying to glue it to the circle.
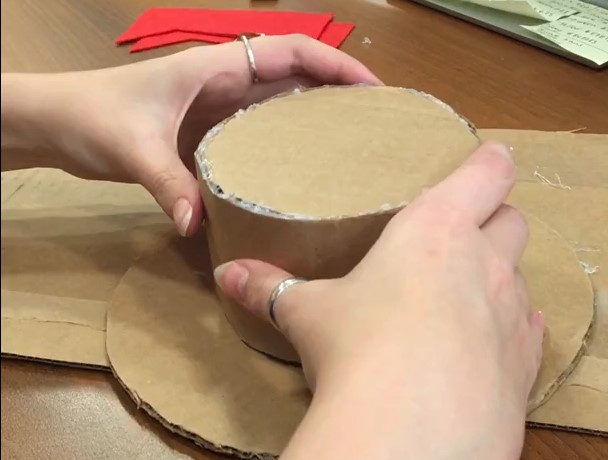
6. Glue the bottom edge of the strip down to the center of the large cardboard circle.

7. Once dry, flip the hat upside down and gently poke a box cutter or x-acto knife through the center of the large circle. Cut out the center of the large circle to hollow out the hat.
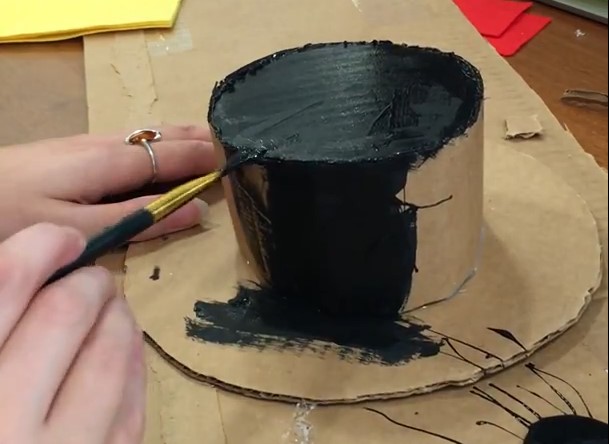
8. Paint the hat black. Once the top is dry, flip over and paint the bottom of the brim.

9. Cut yellow felt into 1-inch strips. Once the paint is dry, glue the felt strips along the bottom edge of the hat’s crown.

10. Cut 1 cm wide strips of black felt.
Tip: You can cut the strips to be curved diagonally to make them longer. Gently pull to straighten the strip.
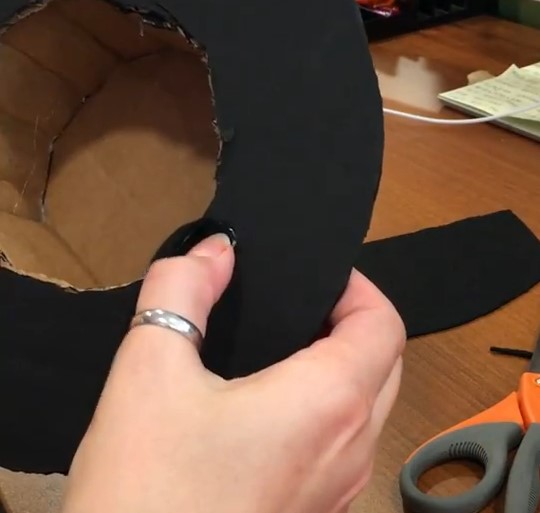
11. Glue one end of black felt strip under the brim across from each other to create straps to tie the hat on.
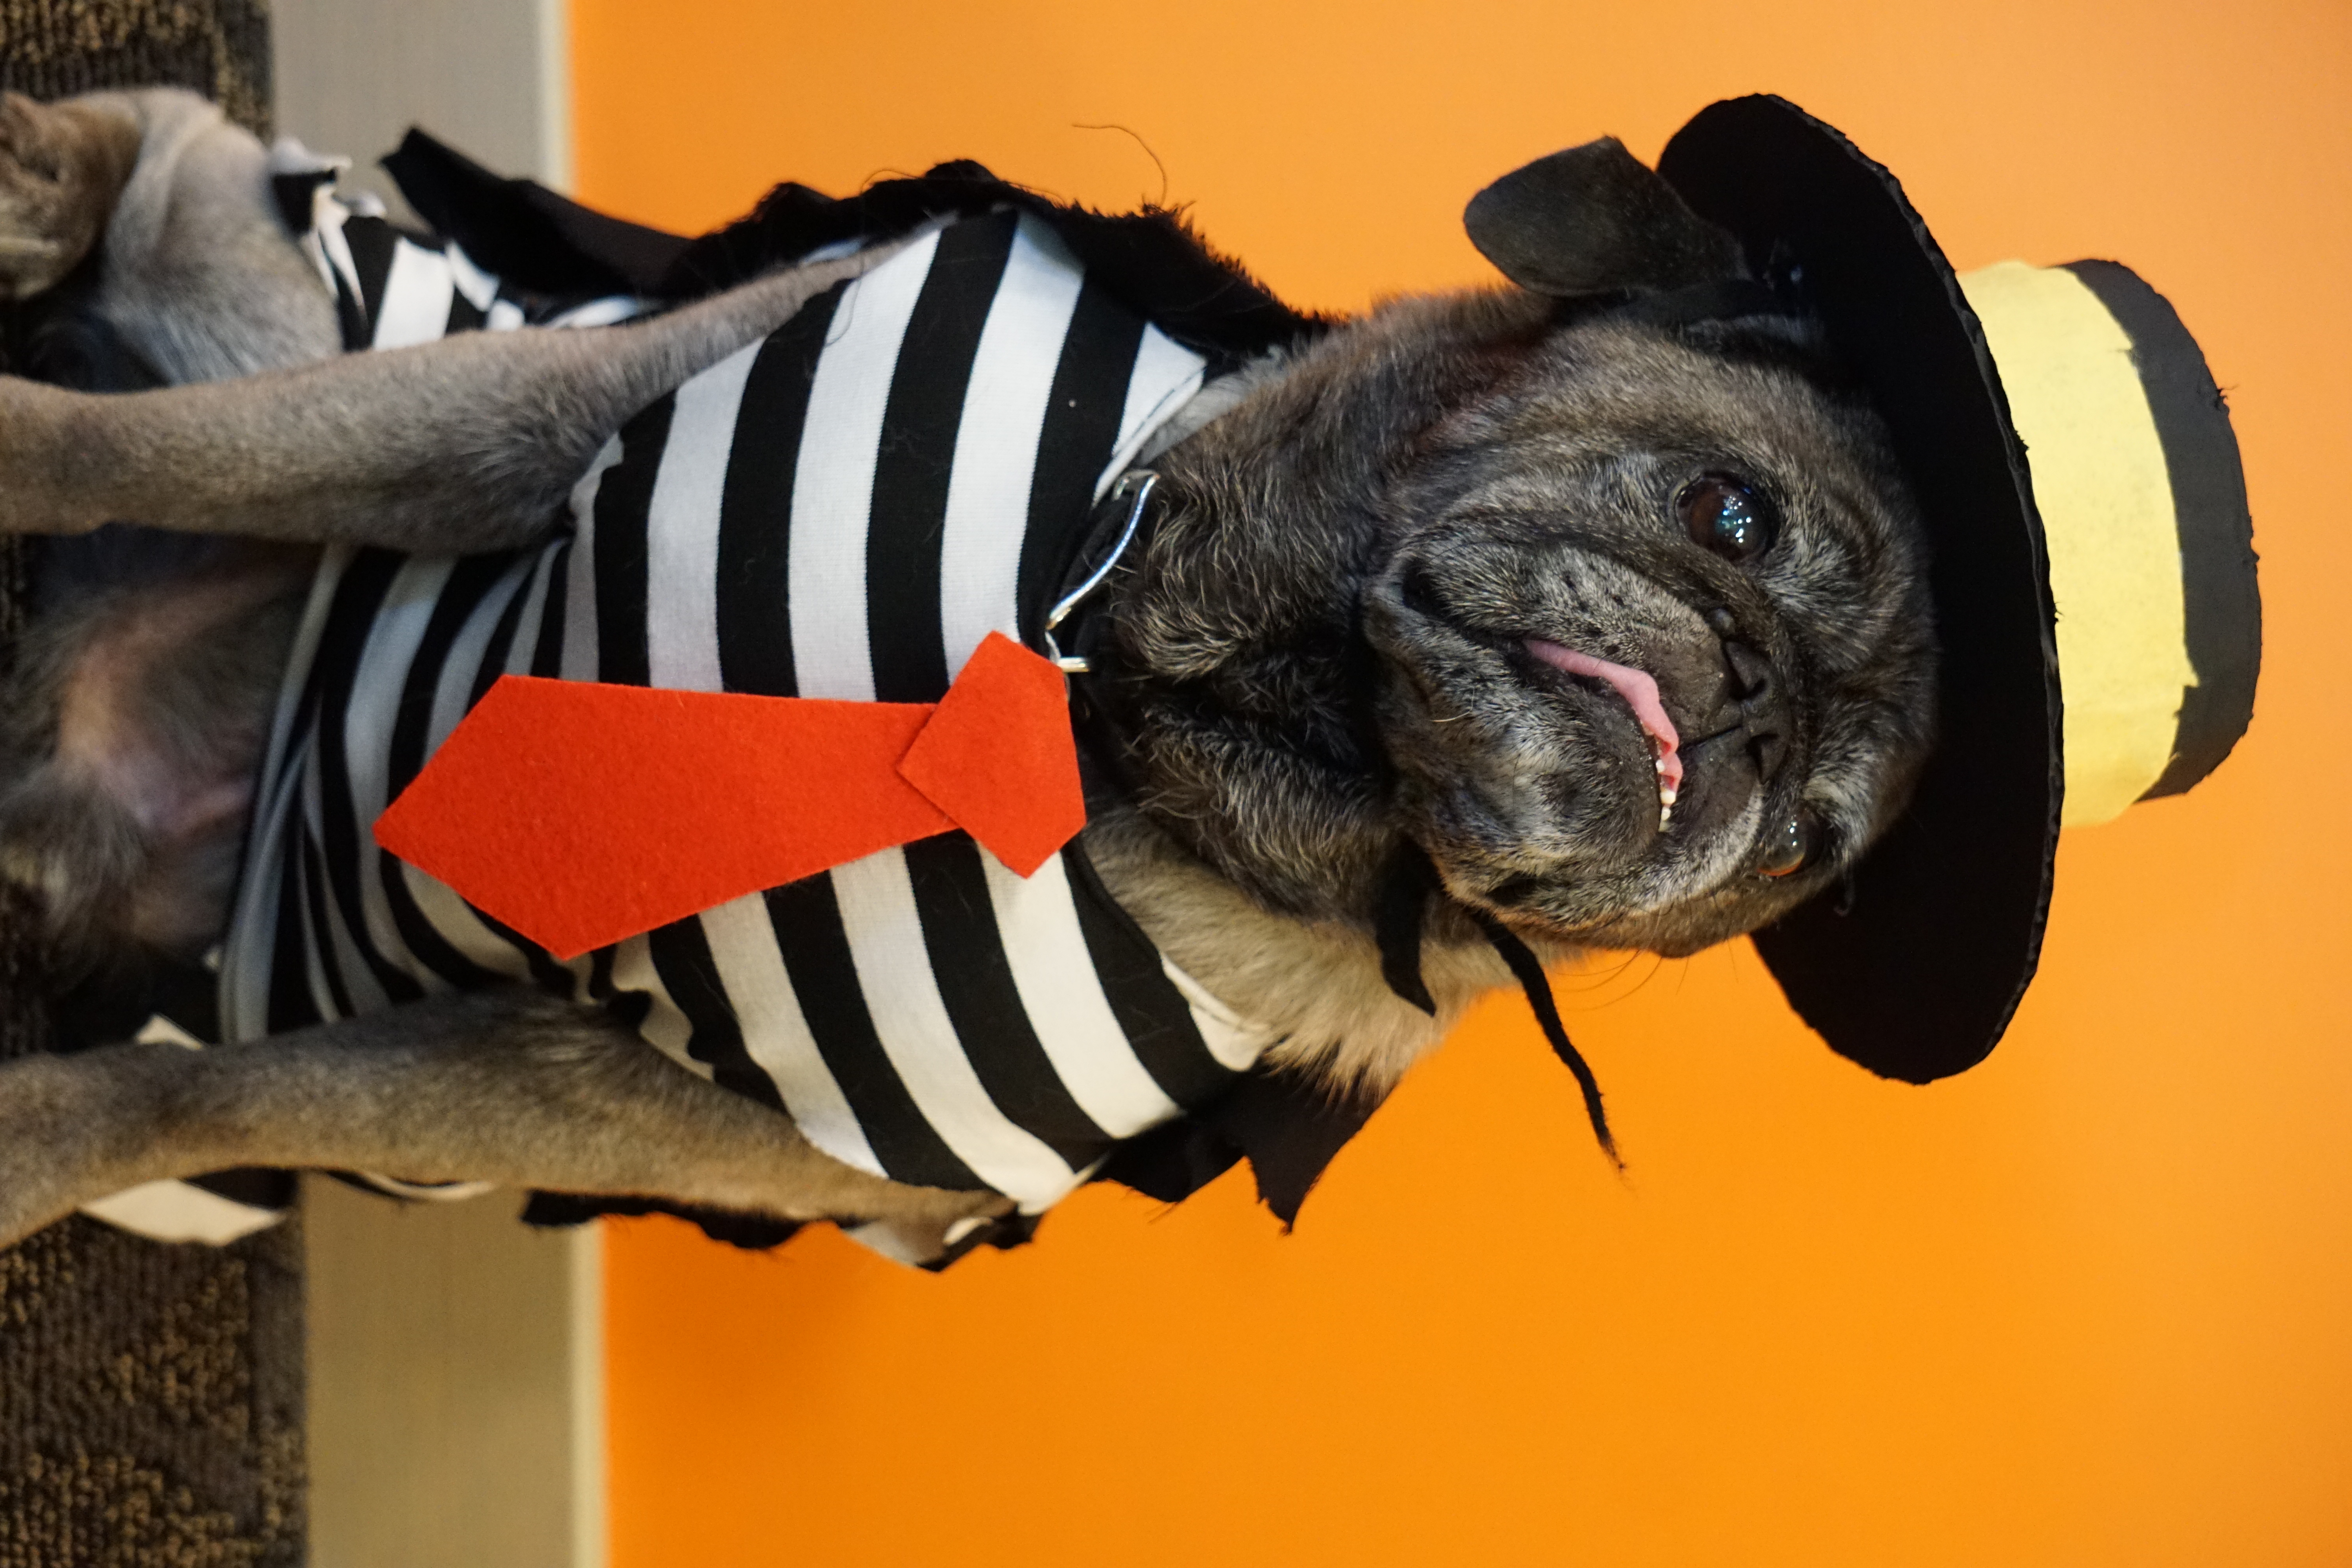
Tag us in pictures of your furkiddo wearing their DIY Hamburglar costume! Don’t forget to enter our #NHVhalloweendancepawty on Instagram to receive a 10% off coupon and be entered into a giveaway! The last day to enter the #NHVhalloweendancepawty is October 21st, 2019!
It is really important to keep your pets away from chocolate.
Reminder: While Halloween can be really spooky and fun, it is really important to keep your pets away from chocolate. If your pet does eat chocolate, take them to the vet right away. After they have been seen by the vet you can give your pet BK Detox and Milk Thistle to help their liver process the toxins in the chocolate.
general wellbeing
Milk Thistle & BK Detox
bundle and save with pet expert kits
3 month supply for a small to medium size pet.
What is it?
Our Natural Detoxification Kit supports gentle detoxification of the liver, and other major organs to remove metabolic wastes and support healthy skin and blood.
How Does it Work?
Why Should I Trust It?
Vet-approved remedies that were carefully crafted with natural ingredients.


What is it?
Our Natural Detoxification Kit supports gentle detoxification of the liver, and other major organs to remove metabolic wastes and support healthy skin and blood.
How Does it Work?
Why Should I Trust It?
Vet-approved remedies that were carefully crafted with natural ingredients.
Anytime your furkiddo is battling an illness such as ezcema, psoriasis, arthritis, liver disease and more, they are likely suffering from a buildup of toxins in their blood. This buildup of toxins may exhaust the liver and kidneys (the waste management system) and leave your furkiddo’s body vulnerable to secondary infections (on top of the conditions they are dealing with). Our Detoxification Kit contains two of our remedies: BK-Detox and Milk Thistle. On their own, each remedy contains many beneficial properties but when combined, they work together to support healthy elimination and increased immune function.
Your vet may recommend specific medications for a health condition that your pet is battling. For added support alongside these vet-prescribed medications, we recommend NHV's Detoxification Kit to help improve their elimination of harmful wastes (that build up from illness) and help restore immune function. This supplement bundle contains BK-Detox and Milk Thistle. BK-Detox contains beneficial herbal ingredients like burdock, cleavers, and gotu kola to help flush toxic wastes from the liver, blood, and other vital organs. Milk Thistle contains silymarin which supports healthy functioning in the liver and kidneys (waste management center) and for promoting healthy skin and blood.
If your furkiddo is struggling with their health, know that you don't have to face it alone. We are here with our team of pet experts to help you every step of the way!
Made with the finest, organically grown, or ethically harvested herbs. Made specifically for pets, vet-formulated and vet approved.
Milk Thistle
BK-Detox
Select your pet's weight to determine the correct dose.
To be taken twice daily. Determine your pet’s weight and then use the easy chart below to determine the correct dose. This is the minimum dosage.
Pet's Weight Dosage
0 - 15 lb = 0.5 ml
16 - 30 lb = 1.0 ml
31 - 45 lb = 1.5 ml
46 - 60 lb = 2.0 ml
61 - 75 lb = 2.5 ml
Over 75 lb = 3.0 ml
How to Administer
Shake well before use. The easiest method is to use the dropper provided and place the drops into your pet’s food or favorite treat. You can also use the dropper and squirt directly into the pet’s mouth. Some pets can be finicky, if this occurs consider hiding the drops in foods most pet’s love such as fish, chicken or yogurt or a favorite treat. If your pet only eats dry food then soak a few kibbles at feeding time.
For Best Results
Herbal dietary supplements are beneficial to the health and well-being of your pet and are safe for long-term use. Every pet responds to natural herbal supplements differently, therefore it is important to be consistent and administer the product daily. Supplements generally take two to four weeks to take effect, however this will vary from one animal to the next.
Product Storage
All NHV Natural Pet Products are pure herbal extracts and contain no artificial additives, preservatives or coloring. Shelf life after opening is 6 months and must be refrigerated after opening.
All information provided by NHV Natural Pet Products is for educational purposes only.
liver support

Support for liver and kidney detox and cancer support in dogs
3 month supply for a small to medium size pet
What Is It?
Milk Thistle for dogs is a gentle supplement that supports liver and kidney health, helps with detoxification, and provides antioxidant protection for long-term wellness.
How Does it Work?
Why Should I Trust It?
100% natural vet-formulated herbal remedy.


What Is It?
Milk Thistle for dogs is a gentle supplement that supports liver and kidney health, helps with detoxification, and provides antioxidant protection for long-term wellness.
How Does it Work?
Why Should I Trust It?
100% natural vet-formulated herbal remedy.
Milk Thistle is a powerful herb that’s been used by humans for thousands of years. The active ingredient, silymarin, has been shown through scientific studies to possess strong anti-inflammatory, antioxidant, and detoxifying properties. It also promotes cellular regeneration and repair.
This supplement by NHV Natural Pet Products uses 100% natural milk thistle to support dogs through liver and kidney conditions in addition to conventional treatment by their veterinarian.
Milk thistle improves kidney function due to the damage from:
The extraordinary antioxidant properties of milk thistle for dog extract acts to:
The scientific name for milk thistle is Silybum Marianum. It’s also referred to as wild artichoke and holy thistle.
Milk thistle for dog liver support can be used in conjunction with conventional treatments and is glycerin based and safe for long-term use. You can read more about the benefits of using milk thistle on Dr. Hillary Cook’s blog.
At NHV, all of our products including milk thistle for dog kidney support are plant-based and make excellent proactive support for many health conditions. If you have questions on milk thistle for dogs or any of our holistic supplements, you can ask an expert at NHV because we put your pet first when it comes to health and healing naturally.

Select your pet's weight to determine the correct dose.
To be taken twice daily. Determine your pet’s weight and then use the easy chart below to determine the correct dose. This is the minimum dosage.
Pet's Weight Dosage
0 - 15 lb = 0.5 ml
16 - 30 lb = 1.0 ml
31 - 45 lb = 1.5 ml
46 - 60 lb = 2.0 ml
61 - 75 lb = 2.5 ml
Over 75 lb = 3.0 ml
How to Administer
Shake well before use. The easiest method is to use the dropper provide and places the drops into your pet’s food or favorite treat. You can also use the dropper and squirt directly into the pet’s mouth.
Some pets can be finicky, if this occurs consider hiding the drops in foods most pet’s love such as fish, chicken or yogurt or a favourite treat. If your pet only eats dry food then soak a few kibbles at feeding time.
For Best Results
Herbal dietary supplements are beneficial to the health and wellbeing of your pet and are safe for long-term use. Every pet responds to natural herbal supplements differently, therefore it is important to be consistent and administer the product daily. Supplements generally take two to four weeks to take effect, however this will vary from one animal to the next.
Product Storage
All NHV Natural Pet Products are pure herbal extracts and contain no artificial additives, preservatives or coloring. Shelf life after opening is 6 months and must be refrigerated after opening.
Cautions and Contraindications
Do not use Milk Thistle in pregnant or nursing animals. Speak to your vet before using our products. A second visit is recommended if your pet’s condition does not improve, or deteriorates after continued use of the supplements.
All information provided by NHV Natural Pet Products is for educational purposes only.
Milk Thistle is a powerful herb that’s been used by humans for thousands of years. The active ingredient, silymarin, has been shown through scientific studies to possess strong anti-inflammatory, antioxidant, and detoxifying properties. It also promotes cellular regeneration and repair.
This supplement by NHV Natural Pet Products uses 100% natural milk thistle to support dogs through liver and kidney conditions in addition to conventional treatment by their veterinarian.
Milk thistle improves kidney function due to the damage from:
The extraordinary antioxidant properties of milk thistle for dog extract acts to:
The scientific name for milk thistle is Silybum Marianum. It’s also referred to as wild artichoke and holy thistle.
Milk thistle for dog liver support can be used in conjunction with conventional treatments and is glycerin based and safe for long-term use. You can read more about the benefits of using milk thistle on Dr. Hillary Cook’s blog.
At NHV, all of our products including milk thistle for dog kidney support are plant-based and make excellent proactive support for many health conditions. If you have questions on milk thistle for dogs or any of our holistic supplements, you can ask an expert at NHV because we put your pet first when it comes to health and healing naturally.
Select your pet's weight to determine the correct dose.
To be taken twice daily. Determine your pet’s weight and then use the easy chart below to determine the correct dose. This is the minimum dosage.
Pet's Weight Dosage
0 - 15 lb = 0.5 ml
16 - 30 lb = 1.0 ml
31 - 45 lb = 1.5 ml
46 - 60 lb = 2.0 ml
61 - 75 lb = 2.5 ml
Over 75 lb = 3.0 ml
How to Administer
Shake well before use. The easiest method is to use the dropper provide and places the drops into your pet’s food or favorite treat. You can also use the dropper and squirt directly into the pet’s mouth.
Some pets can be finicky, if this occurs consider hiding the drops in foods most pet’s love such as fish, chicken or yogurt or a favourite treat. If your pet only eats dry food then soak a few kibbles at feeding time.
For Best Results
Herbal dietary supplements are beneficial to the health and wellbeing of your pet and are safe for long-term use. Every pet responds to natural herbal supplements differently, therefore it is important to be consistent and administer the product daily. Supplements generally take two to four weeks to take effect, however this will vary from one animal to the next.
Product Storage
All NHV Natural Pet Products are pure herbal extracts and contain no artificial additives, preservatives or coloring. Shelf life after opening is 6 months and must be refrigerated after opening.
Cautions and Contraindications
Do not use Milk Thistle in pregnant or nursing animals. Speak to your vet before using our products. A second visit is recommended if your pet’s condition does not improve, or deteriorates after continued use of the supplements.
All information provided by NHV Natural Pet Products is for educational purposes only.
We have a dedicated group of pet expert professionals, including veterinarians, vet techs, and other pet professionals to guide you through any questions. We’re committed to your pet’s wellness and can offer additional tips, resources, nutritional advice, and more.
Published: October 11, 2019
immune support
Detoxifies the Blood and Organs, Boosts (support) the Immune System
buy 2 and save $3
3 month supply for a small to medium size pet.
What is it?
A dog immune support supplement that helps with compromised immune systems that may be fighting cancer, skin problems or heartworms.
How Does it Work?
Why Should I Trust It?
Natural, safe, and vet-formulated.


What is it?
A dog immune support supplement that helps with compromised immune systems that may be fighting cancer, skin problems or heartworms.
How Does it Work?
Why Should I Trust It?
Natural, safe, and vet-formulated.
Dogs live in a world full of pollutants that they breathe, ingest, and play in every day. Protect them with BK Detox, an all-natural dog immune system (support) booster and detoxifier specially formulated to restore balance, regulate the immune system, and help your pet live a healthier, happier life.
What many people think of as boosting the immune system is actually balancing the immune system. A balanced immune response is the healthiest for helping your pet’s body detect and respond to toxins and infections.
Your dog’s body filters blood impurities through the liver and other vital organs of a dog’s body and then supplies nutrients and oxygen to the cells and tissue, which plays an important role in keeping your dog healthy. BK Detox dog immune system support and detoxifier will help flush toxins out of your pet’s blood and vital organs. When the immune system is compromised, toxins can accumulate in your dog and cause problems including liver disorders, urinary tract infections, skin allergies, tumors, bad breath, and respiratory issues.
Red Clover – A blood-purifying herb with antibiotic and anti-inflammatory properties. It promotes cleansing and the elimination of toxins and deposits through diuretic and expectorant activity.
Cleavers – A tonic that increases the circulation of lymph-impaired areas of the body and aids in the drainage of lymph-engorged cysts, tumors, and inflamed tissues of the urinary tract.
Neem – Has powerful blood purifying and detoxifying effects.
Oregon Grape – Supports and improves digestion by helping rid the body of waste and toxins in the blood.
Gotu Kola – Known for its cleansing, diuretic, and strong antioxidant properties.
Buckthorn – A gentle laxative and blood-cleansing tonic.
Burdock – A highly effective blood purifier abundant in calcium, phosphorus, iron, thiamine, and riboflavin. Supports the entire body while gently eliminating toxic build-up.
Sarsaparilla – A cleansing herb that stimulates the kidneys to flush deposits and clear toxins.
Echinacea Angustifolia – Boosts a dog’s immune system and stimulates the body’s defense mechanism.
Chaparral – A blood purifying antioxidant-rich in amino acids.
Prickly Ash – A tonic that stimulates the entire lymphatic system to encourage the elimination of toxic metabolites.
Select your pet's weight to determine the correct dose.
Bk Detox can be used as a detoxifier every 6 months. For best results administer the recommended dosage until the bottle is finished.
To be taken twice daily. Determine your pet’s weight and then use the easy chart below to determine the correct dose. This is the minimum dosage.
Pet's Weight Dosage
0 - 15 lb = 0.5 ml
16 - 30 lb = 1.0 ml
31 - 45 lb = 1.5 ml
46 - 60 lb = 2.0 ml
61 - 75 lb = 2.5 ml
Over 75 lb = 3.0 ml
For small animals (rabbits, ferrets), avians and reptiles use 1 drop for every 2 lb of body weight.
How to Administer: Shake well before use. The easiest method is to use the dropper provided and place the drops into your pet’s food or favorite treat. You can also use the dropper and squirt directly into the pet’s mouth. Some pets can be finicky, if this occurs consider hiding the drops in foods most pet’s love such as fish, chicken, yogurt, or a favorite treat. If your pet only eats dry food then soak a few kibbles at feeding time.
For Best Results
Herbal dietary supplements are beneficial to the health and well-being of your pet and are safe for long-term use. Every pet responds to natural herbal supplements differently, therefore it is important to be consistent and administer the product daily. Supplements generally take two to four weeks to take effect, however this will vary from one animal to the next.
Product Storage
All NHV Natural Pet Products are pure herbal extracts and contain no artificial additives, preservatives, or coloring. Shelf life after opening is 6 months and must be refrigerated after opening.
Cautions and Contraindications
Do not use BK Detox in pregnant or nursing animals.
Speak to your vet before using our products. A second visit is recommended if your pet’s condition does not improve, or deteriorates after continued use of the supplements.
All information provided by NHV Natural Pet Products is for educational purposes only.